
May Flowers
Week one
Week one
Spring is in full bloom and we are enjoying the pretty flowers
all around us. We also have been busy stitching and finishing projects
for our new blog Stitching
Friends Forever.
STYLING WITH STITCHES
While we have been working hard, our sewing
machines have been humming along getting everything sewn up. So we
thought we would treat them to sewing machine covers with new cross stitch
patterns and fabrics. They were a lot of fun to stitch. Why not make one for your machine too?
RJ's: This is a simple finish that can be made as easy or hard as you want. First just find a cross stitch pattern that you love and want to put on your sewing machine cover. I chose This is my Happy Place by The Scarlett House. I think cross stitching is the happy place for so many of us and I loved stitching this design.
RJ's: This is a simple finish that can be made as easy or hard as you want. First just find a cross stitch pattern that you love and want to put on your sewing machine cover. I chose This is my Happy Place by The Scarlett House. I think cross stitching is the happy place for so many of us and I loved stitching this design.
 |
| Cross stitch, fabrics and rick rack Added bird on spool and rosebud border to stitch |
I bought this lovely fabric of rosebuds and tiny birds at a great little quilt shop. I was all set to use it for the sewing cover, but I worried the white background just didn't go with the country mocha linen. I went back and forth on using this fabric. At first it seemed the white background might pull out the white letters on the stitch. I thought if I added a row of rosebuds to the bottom and a tiny bird on one of the spools it would work even better. I was all ready to go with it...but then I decided to look more at fabrics I already had. The red and cream check seemed better suited for it. But I still really wanted to use the rosebud fabric too. So, I coffee dyed a small piece for pockets and added it to the check cover. Now I was happy! (the rosebud border chart can be found here).
I decided to line mine, add rick rack trim and stripe ties. I added a double pocket for embroidery scissors, a small ruler and pins. You can add any embellishments you wish like lace, buttons, a ruffle etc. Then it just needs some ties which you can add with buttons or stitched into your seam when you line it.
🔻

Next week we have a grab bag post we hope you will enjoy and our stitches from our challenge. Until then, hope you get lots of stitching in this week. Mary and RJ
Every flower is a soul blossoming in nature
Gerard Nerval
 |
| Coffee dyed pockets |
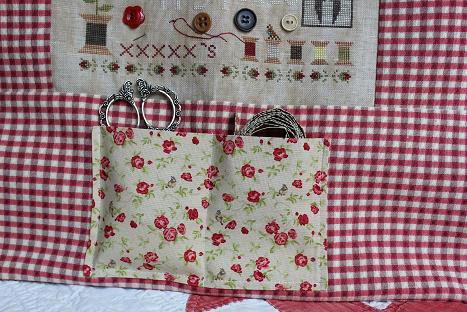 |
| Pocket with rosebuds and tiny birds picks up the bird and rosebud border in the stitch |
I decided to line mine, add rick rack trim and stripe ties. I added a double pocket for embroidery scissors, a small ruler and pins. You can add any embellishments you wish like lace, buttons, a ruffle etc. Then it just needs some ties which you can add with buttons or stitched into your seam when you line it.
 |
| Stripe Ribbon Ties |
 |
| This is my Happy Place by The Scarlett House 40 ct. country mocha linen over dyed threads |
🔻
Mary's: My Stitching Friend Forever suggested the pattern Pineberry Lane's Proper School of Needlework when I was looking for something that would work for a sewing machine cover. With just a few adaptations, I was very pleased with the result.
 |
| Stitch and fabrics used |
I made a few changes to the original pattern. I changed the words to our blog name, gave one of the sisters blonde hair and completed the thread on the spools a different way. I filled in all the spools with X stitches in DMC 869 and then wrapped the spools with DMC 613. I used the chart LHN's Quaker Bird for the flowers instead of the ones that were called for.
I had no idea how to center words but with RJ's instructions I was easily able to make the adaptation. Moda has some of the best fabrics and I chose Kansas Troubles Favorites II in two contrasting colors. I am very pleased with how my cover turned out. I even lined it! I hope you enjoyed seeing our sewing machine covers.
 |
| Closeup of trim and heart buttons |
 |
| Proper School of Needlework by Pineberry Lane 28 ct. cream Cashel linen called for threads with changes listed above |
Every flower is a soul blossoming in nature
Gerard Nerval
Both of these projects are wonderful. I love the finish on This is my Happy Place. The pockets are a great idea. I have added that pattern to my wish list. I like Mary's adaptation of Proper School of Needlework. This is a great cover also.
ReplyDeleteHi Cathie! So happy you came by to see us. Happy Place was a lot of fun to stitch. I know you will enjoy it. I love how Mary adapted her stitch to our blog too. Thanks for the visit. RJ
DeleteThank you so much Cathie, so glad you stopped by, this project was fun but a bit more work that we thought it was going to be, but our sewing machines are now properly dressed!
ReplyDeleteYay, your sewing machines look all nice & smug with their lovely covers! Great finishes on both! They are different in style & colours but cannot make my mind which I prefer.. both!!!
ReplyDeleteThank you Mii, they are both much different in style, I love RJ's finish, so happy!
DeleteThank you Mii! We wanted to show the two ways you can make them...one fitted and one just tied on. We are so happy you like them. RJ
DeleteOh how clever! And pretty! Both of them. :D
ReplyDeleteThank you for stopping by my blog and encouraging me!
Thanks for visiting and commenting Vickie, your woodpecker stitch was great, I have to restrain myself or every stitch would be birds! Mary
DeleteHi Vickie! So happy you stopped by and liked our sewing covers. You are doing great on the signatures and we all need that encouragement to keep us going. RJ
DeleteI really enjoyed reading about your sewing machine covers that you created and the process you both went through to get to your end results. Enjoy your weekend!
ReplyDeleteHi Robin! We always appreciate your kind comments. Oh if you only knew the rest of the story! LOL! Hope you have a lovely weekend too. RJ
DeleteHow cool projects!! I love your pieces and adaptations for the sewing machine covers!
ReplyDeleteWell done!! :)
Happy weekend!
Hi Lili! Coming up with our plans was fun but sewing them not so much. Really enjoyed your new stitches as well. Happy weekend to you too. RJ
DeleteGreat work on both projects. I've just said on Sarah's blog how much I like Country Mocha (also Light and Vintage Mochas!).
ReplyDeleteI also like the way Mary has stitched the spools. I always do satin stitch for spools.
RJ asked about being a "no-reply" blogger. It's because you don't have your email on your Blogger profile. If you reply to this comment by email (not on this blog) I can tell you how to change that!
Most people don't return to blogs to check for replies, so most of us reply by email.
Hi Jo! I'm a big fan of the country mocha too but it forced me to dye the little print fabric as the white was screaming. The spools are alot of fun to stitch...I've seen them done so many different ways. I liked the version Mary chose too. I now understand what a no reply blogger is. I will send you an email. Thank you. RJ
DeleteWhat cute sewing machine covers you two have made! I love them both. Great stitching and fabric choices. Your sewing machines should be very happy with their new covers.
ReplyDeleteHi Faith! Thank you so much for coming by to see our sewing machine covers. We are thrilled to have you here. Have a great weekend. RJ
DeleteAbsolutely darling covers! I would never have thought to decorate the cover with a stitched piece. I just bought a sewing machine cover pattern not too long ago...I'll have to think about this!
ReplyDeleteSusan do it...they are so much fun!!! I know you like LHN patterns and there are plenty to pick from that would work so well. Hope you are having a great weekend and thanks for stopping by. RJ
DeleteThank you Susan, hope you add a stitch to yours to personalize it! It was a fun project to do.
DeleteThis comment has been removed by the author.
ReplyDeleteI love these! Did you use tutorials or just design them yourselves? I have a very boring cheap and flimsy cover that came with my machine and am feeling inspired but my sewing skills are a bit basic!
ReplyDeleteJustine, My skills are basic so I bought a pattern which was unnecessary. I just measured my pattern pieces for you. Cut 2 pieces 17 1/2 long x 13 inches high for the front and back. The top piece on each has a very, very slight curve for the corners. Pin those to a piece 40 inches long by 8 inches(that is for the depth of the machine) pin the front and back to the long piece. You will see how the cover takes shape when you pin it. I bought navy quilted fabric at Joannes that was navy in color on both sides. I hand basted the quilting fabric to the cover fabric and then pinned it all together. You don't have to line it but I wanted my cover to be heavier to hold the shape.
DeleteI hope this helps!
RJ, is a much more accomplished sewer than I am and she designed her own. I'm sure she will help with any questions if you want to make her style.
So glad you stopped by and happy to inspire you to sew!!
Hi Justine! The sewing machine covers are alot of fun and you can do as much or as little as you want. We did two different styles to show a fitted one and another that just ties on. If it is ok I can email you with a drawing and detailed directions for the tie on style. I think you would understand it better than me trying to explain it here. Let me know. You can reach me at rjgator96@gmail.com Thanks for stopping by. RJ
DeleteLoved your sewing machine covers, both the stitching and the fabrics.They will look beautiful in your sewing rooms.
ReplyDeleteHi Shirley! So happy you stopped in and got to see our sewing covers. I wish I had a room just for sewing. The kitchen table seems to be where I get most of my sewing done. But I am going to try and carve out a spot up in our bonus room this year. Have a great week. RJ
DeleteShirley,Like RJ, my sewing spot is my kitchen table but when I have to leave it out it certainly will look better dressed. Happy Stitching!
DeleteBeautiful finishes--I especially love the Happy Place finish! Gorgeous!
ReplyDeleteHi Honeybee! So happy you stopped by for a visit. Glad you liked our finishes for our sewing machine covers. I always enjoy your finishes. I'm anxious to see those Texas ones finished. RJ
DeleteI loved RJ's finish too, so fun!! Thanks for visiting. Mary
DeleteOh, these are both so cute--and useful. Definitely something I should consider as I use an old pillowcase to cover my machine at this point :) Wishing you both a very happy weekend!
ReplyDeleteHi Carol! How did the party go? I'm sure it all went great. The covers are handy and I'm sure you could do an adorable one. Your machine deserves one. Hope you have a great weekend too. RJ
DeleteThose are just beautiful. You did a wonderful job. The cross stitch patterns are just perfect. Have a great weekend
ReplyDeleteThose are just beautiful. You did a wonderful job. The cross stitch patterns are just perfect. Have a great weekend
ReplyDeleteHi Cindy! Thank you for stopping by. Glad to hear you had so much fun at Biltmore...it is an awesome place. Glad you liked our sewing covers...a good way to use some of your buttons. RJ
DeleteThank you Cindy, have a great week. Mary
DeleteI would love to be entered in the give a way
ReplyDeleteI would like to enter the giveaway, thanks!
ReplyDelete